Last updated December 23, 2023
Foreign Exchange & Payments
Save money and eliminate volatility on Foreign Exchange with myCaribou FX and Payments--no minimums or collateral required. With this solution you can access unbeatable rates or lock-in for up to 350 days, backed by the world's top banks, all on myCaribou!
- To get started, login to myCaribou and click the FX and Payments tab in your left navigation menu. Then click "request access." Our team will follow up with more information and an application form to complete your onboarding with myCaribou FX & Payments.
- Alternatively, you may schedule a demo with us here.
Manage and Grow your Partnerships with Enhanced Business Plans
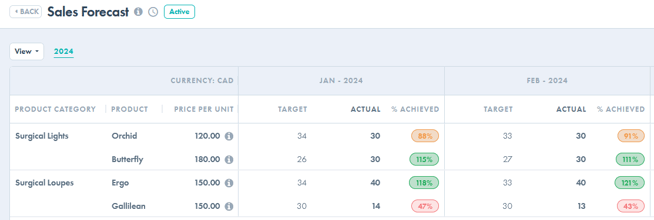
- Forecast better with unit-based and revenue-based Sales Plans.
- Track performance with monthly and quarterly planning in your Scorecard and Sales Plans.
-
- New to Business Plans? Learn more about Scorecard Plans here and Sales Plans here.
- Schedule a demo with our Customer Care team to learn more about our Partner Management suite of business tools.
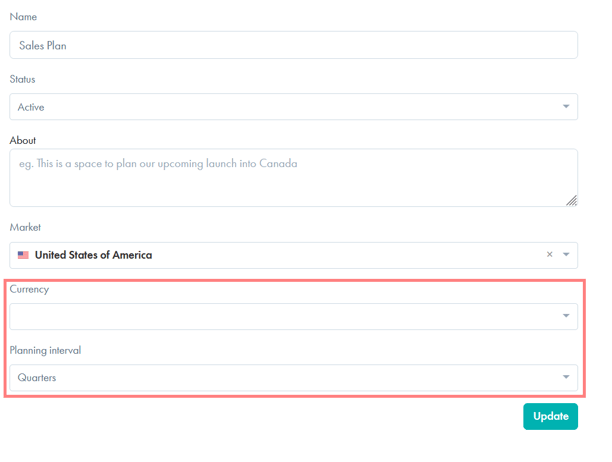
To edit the planning interval and set the plan currency:
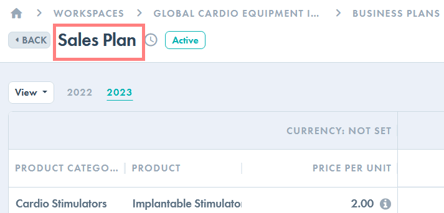
- Open the plan and then click on the title of the plan to access the plan profile.
- Select a currency (applies to Sales plans only) and set the desired planning interval. Then, click "Update."
To add unit-based tracking to your sales plan
- If you see the "Legacy" tag when viewing your Sales plan, it means you are not using the latest version sales plan available. Legacy plans can be viewed but will need to be updated before editing.
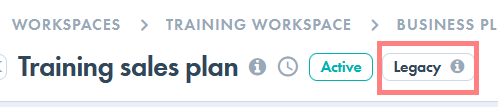
- To update to the latest version: click the Edit button when viewing your sales plan.
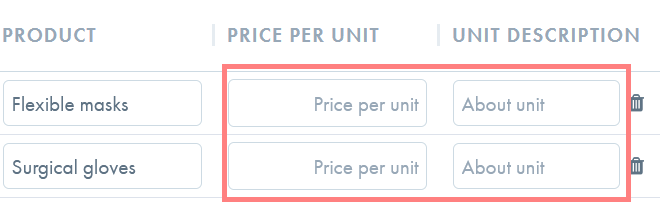
- Enter values for the "Price Per Unit" and "Unit Description."
- Note, after saving these values, your plan will be converted to a unit-based plan. The numbers entered in the "Target" and "Actual" fields will not change when viewing the plan in the "sales by units" view. When you toggle to the "Sales by revenue" view, the values displayed will equal your "Price per unit" multiplied by your Unit-based "Targets" and "Actuals" values respectively.
- Note, after saving these values, your plan will be converted to a unit-based plan. The numbers entered in the "Target" and "Actual" fields will not change when viewing the plan in the "sales by units" view. When you toggle to the "Sales by revenue" view, the values displayed will equal your "Price per unit" multiplied by your Unit-based "Targets" and "Actuals" values respectively.
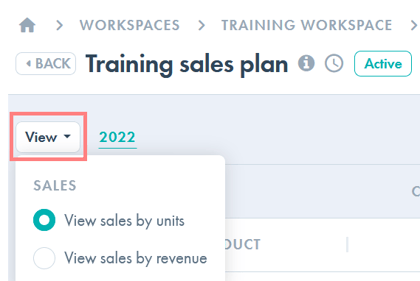
- After saving your changes, use the "View" menu to toggle between the different view options as needed.
Save time by adding business plans to multiple workspaces at once
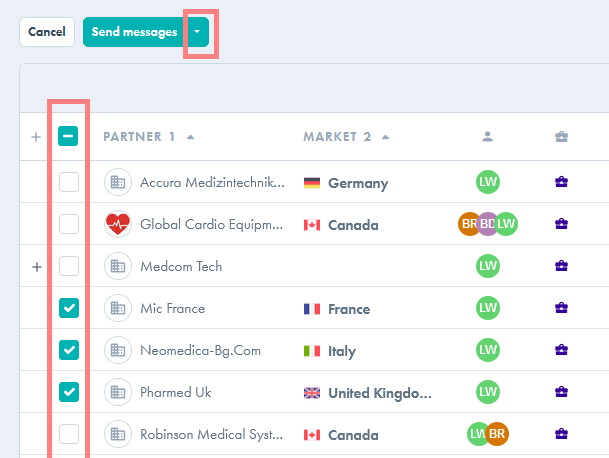
- When viewing your My Partner's dashboard (the My Partners tab), click the "Edit" icon to select multiple partner workspaces in one action.
- Select the workspaces you'd like to add plans to. Then click the arrow next to "Send messages."
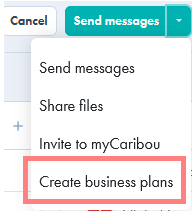
- Select "Create business plans."
- Choose the type of plan you'd like to create and select the template you'd like to use for each. Templates are optional but highly recommended as they will save you time! Learn more about templates here.
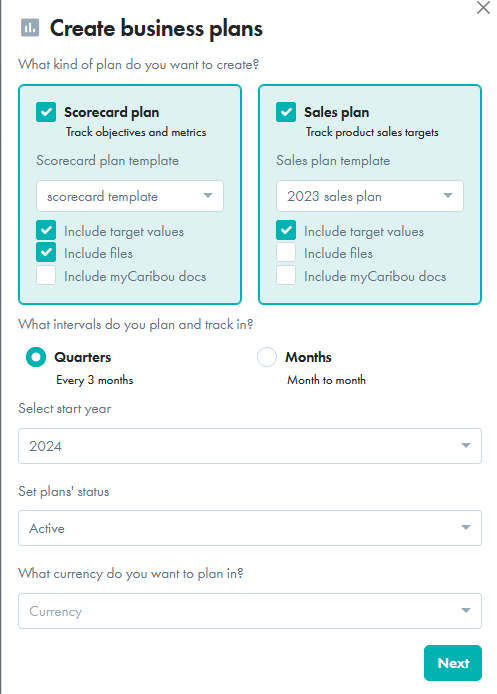
- Fill in the required information and click "Next." You'll be asked to confirm the details of the plans being created, click "Create plans" to confirm and create the plans noted.
- Each plan will be added to the workspace specified. You may access each plan and update further by clicking on the workspace icon followed by the Business Plans tab.
Manage conversations with new partner leads
- Shortlists help you track your progress with your supplier leads. If you have an ongoing conversation with any of the companies in your shortlist(s), you will now see a link to that conversation in your shortlist.